Vba Loop Through Rows Add Column Loop Again
The art of Excel VBA programming is in the manipulation of properties of objects of Excel. The more skillfully you can play with these objects and properties, the more powerful the macros you can build.
The number one object in Excel you have to process is by far the Range object. In this article, I am going to walk you through the critical skills to loop through ranges in Excel worksheets.
Contents
- Loop through cells in a range
- Method 1: with a range variable
- Method 2: with a numeric variable
- Important note on numeric variable type
- Note on order of cells being processed
- Loop through rows or columns in a range
- Method 1: with a range variable
- Method 2: with a numeric variable
- Advanced strategies
- Deleting columns (or rows)
- Loop though every n-th row in a range
- Conclusion
Loop through cells in a range
The main skill to loop through a range is with FOR-NEXT loops. There are two FOR-NEXT loop conventions, which are both very useful when we loop through ranges. I would highly recommend to learn both skills.
Method 1: with a range variable
In the Range object, there are many Cell objects. We can therefore think of a Range as a group of Cells. We can effectively use the "For Each element In group" convention of the For-Next statement to loop through every Cell inside a Range.

The macro LoopCells1 loops through every cell in Range "A1:C5" and applies a sequential counter into the content of each cell.
Sub LoopCells1() Dim cell As Range Dim counter As Integer 'loop through each cell object element within a range For Each cell In Range("A1:C5").Cells counter = counter + 1 'denotes the nth cell cell.Value = counter Next End Sub The result after running the macro looks like this:

Method 2: with a numeric variable
Most VBA users are more confident with the For-Next loop convention of:
For counter = start To end
This convention can also be used to loop through cells within a range. The macro "LoopCells2" demonstrates how to loop through each cell in range A1:C5 by referring to the index number of cells. The loop begins with the index number of 1 to the upper bound which is the total number of cells in the range.
Sub LoopCells2() Dim c As Long Dim counter As Integer 'loop through each cell within a range by calling the index number of the cells For c = 1 To Range("A1:C5").Cells.Count 'put the index number into cell Range("A1:C5").Cells(c).Value = c Next End Sub The result after running the macro "LoopCells2" looks identical to the result of the previous macro "LoopCells1".

Important note on numeric variable type
One limitation of this method is with the upper limit of the numeric variable being declared and used in the For-Next loop. There are a few points you need to bear in mind:
- Avoid declaring an Integer typing variable for this purpose because the number of cells in a worksheet is far more than 32,767.
- Declare a Long variable instead, so that the loop can process up to 2,147,483,648 cells, which serves most cases.
- Declaring a Double variable type won't solve the limitation.
- In case your process exceeded the limit of even a long variable, you will have to restructure your For-Next loop to use the "For Each element In group" convention.
But even with such limitations, this is still a very useful method. It's often used because, in most situations, the limits of the variable type won't be reached.
Note on order of cells being processed
When using either of the two methods above, the cells in the range are being processed in the same sequence: from left to right, then from top to bottom. The picture below visualizes such sequence:
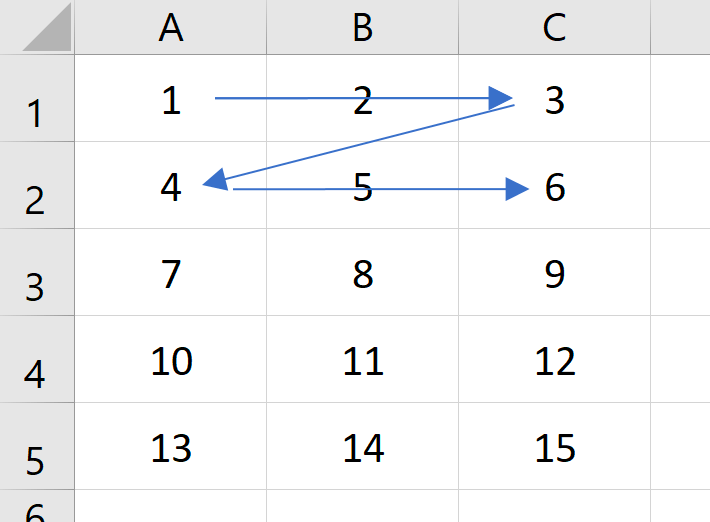
If you want the cells to be processed in a different order, you need to learn other strategies which will be explained in the next few sections.
Loop through rows or columns in a range
Sometimes we want to loop through each row in a range (from top to bottom). Similar to looping through cells, we can do it with both conventions of the For-Next statement, either with a range object variable or a numeric variable.
Method 1: with a range variable
Sub LoopRows1() Dim r As Range Dim MyString As String 'Loop through each row, and apply a yellow colow fill For Each r In Range("A1:C5").Rows r.Interior.ColorIndex = 6 Next End Sub To loop through columns, we just need to change the first line of the For-Next loop to go through the columns instead. In the example below, we want to loop through each column in range A1:C5, and change the column heading to Proper Case (first letter of each word in capital).

Sub LoopColumn1() Dim c As Range Dim MyString As String 'Loop through each column and set first cell to Proper Case For Each c In Range("A1:C5").Columns c.Cells(1).Value = StrConv(c.Cells(1).Value, vbProperCase) Next End Sub Method 2: with a numeric variable
In this example, we want to loop through every column in a data table. (See picture of our sample data below.) If a column contains numeric data, we set the NumberFormat to 2 decimal places.

'apply 0.00 number format to columns with numeric values Sub FormatNumericColumns() Dim c As Integer Dim MyString As String With Range("A1").CurrentRegion For c = 1 To .Columns.Count 'test 2nd cell of column for numeric value If IsNumeric(.Columns(c).Cells(2).Value) Then .Columns(c).NumberFormat = "0.00" End If Next End Sub The result of the macro looks like the image below. The number format of the last 3 columns with numeric data has been set to 2 decimal places.

(The dates in the first column are not considered by the VBA IsNumeric function as numeric. Please read my other article all about IsNumeric for more detail on this topic.)
Advanced strategies
Deleting columns (or rows)
Here we want to write a macro to delete the three columns with headings with the word "delete" (the yellow columns). We can tackle this problem with a For-Next loop we learned in the sections above.

First Attempt:
We can try to loop through each column with the "For Each element In group" convention. The macro below looks simple and straight-forward enough, looping through each column (element) within the group of columns in range A1:C5.
Sub DeleteColmns1() Dim c As Range Dim x As Integer With Range("A1:E5") For Each c In .Columns If c.Cells(1).Value = "delete" Then c.Delete End If Next End With End Sub The result of the macro looks like the picture below. The macro has failed to delete all the three columns.

Reminder: When looping through a range, if you want to apply structural change to the range, NEVER use the "For Each element In group" convention because it may create unexpected results. In some cases, (e.g. insert columns), it will even cause an infinite loop and your Excel may be frozen and you'll have to force quit Excel and lose your unsaved work.
Second Attempt:
Now, how about using the "For counter = start To end" convention?
Sub DeleteColmns2() Dim tmp As Integer Dim x As Integer With Range("A1:E5") For x = 1 To .Columns.Count If .Columns(x).Cells(1).Value = "delete" Then .Columns(x).Delete End If Next End With End Sub The result looks identical to that of the previous macro:

If we looked at the result more carefully, we noticed that the original 2nd and 4th column were deleted, but the original 3rd column was not. This was because when the 2nd column was deleted (when x=2), the 3rd column has become the 2nd column which has been skipped when the For-Next loop proceed to process x = 3.
Solution:
So, how do we tackle this problem? The answer is with the For-Next statement convention of "Forcounter =end To start step -1″, which processes the range from back to front (from the last column backward to the first column).
Sub DeleteColumnFinal() Dim x As Integer With Range("A1").CurrentRegion For x = .Columns.Count To 1 Step -1 If .Columns(x).Cells(1).Value = "delete" Then .Columns(x).Delete End If Next End With End Sub Loop though every n-th row in a range
We have a data table, and we want to apply a yellow shading (fill) to the odd number rows. And we don't want to shade the first row which contains the field headings.

Solution 1:
We can use the "For counter = start To end" convention to tackle this problem. We can loop through each row beginning from the 2nd row (which bypassed the field headings). If the row number is odd, we apply a yellow color.
'Shade alternate (even) rows of data Sub ShadeRows1() Dim r As Long With Range("A1").CurrentRegion For r = 1 To .Rows.Count If r / 2 = Int(r / 2) Then 'even rows .Rows(r).Interior.ColorIndex = 6 End If Next End With End Sub 
To enhance the macro to shade every n-th row, simply change the 2 in line 5 to n. For example:
If r / 3 = Int(r / 3) Then 'every 3 rows
Solution 2:
We can also use the "Forcounter = start to end step 2" convention. In the macro "ShadeRows2", the loop begins from the 2nd row and then the 4th row, then 6th row, etc.
'Shade alternate (odd) rows of data from the 3rd row Sub ShadeRows2() Dim r As Long With Range("A1").CurrentRegion 'begin from 2nd and shade every other row For r = 2 To .Rows.Count Step 2 .Rows(r).Interior.ColorIndex = 6 Next End With End Sub
To enhance the macro to shade every 3rd row, simple change the 2 in line 5 to 3. For example:
For r = 3 To .Rows.Count Step 3
Conclusion
We have gone through in detail the different approaches to loop through a range in VBA, including the pitfalls and a couple of special scenarios. These techniques can also be applied in combination or with other VBA techniques to achieve more powerful automation with worksheet ranges in your macros.
hamiltonainal1983.blogspot.com
Source: https://software-solutions-online.com/vba-loop-through-range/
0 Response to "Vba Loop Through Rows Add Column Loop Again"
Postar um comentário